Tips for Using Mildliners in Planners
Tips for Using Mildliners in Planners
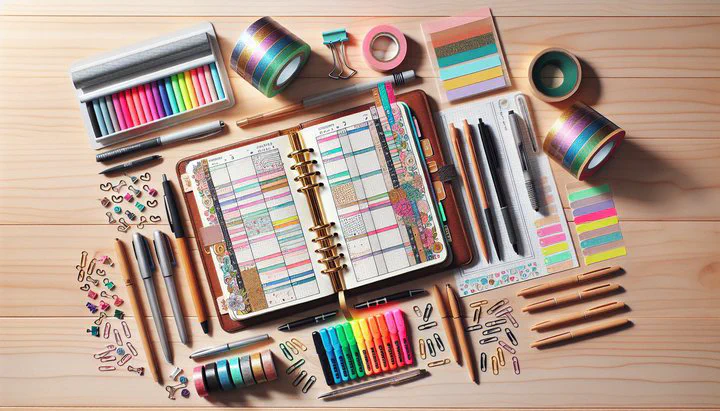
Introduction to Mildliners in Planners
Are you looking for a way to bring your planner to life with color and organization? Enter Mildliners! Welcome to the colorful world of Mildliners! If you’ve ever flipped through planner pages filled with vibrant hues, you’ve probably seen these popular tools in action. Mildliners are a type of highlighter that have taken the planner community by storm, and for good reason. Unlike regular highlighters, Mildliners boast dual tips—a broad tip for highlighting and a fine tip for detailed work. This versatility makes them perfect for all your planning needs.
So, what makes Mildliners so special? One key feature is their wide range of colors. From soft pastels to bold neons, these highlighters offer shades that suit any mood or theme. This variety allows planner enthusiasts to express their creativity while staying organized. Their ink is also less likely to bleed through pages, making them ideal for delicate planner papers.
Using Mildliners in your planner can transform how you organize your life. They help you highlight important tasks, create clear divisions, and add a splash of color to your days. Whether you’re marking a due date or decorating a journal entry, Mildliners make it easy to keep your planner both functional and beautiful. Plus, their gentle colors are easy on the eyes, ensuring your planner remains a joy to use.
In the world of planners, aesthetics matter just as much as functionality. Mildliners strike the perfect balance between the two, making them a favorite among planner lovers everywhere. As you dive into the following sections, you’ll discover tips for using Mildliners in planners to enhance both organization and visual appeal. Get ready to unlock the full potential of these amazing tools and bring your planner to life!
How to Highlight Important Tasks with Mildliners
Highlighting important tasks in your planner is a great way to keep track of what needs your attention. Mildliners are perfect for this job because of their vibrant colors and dual tips. Let’s dive into some effective techniques for making your tasks stand out, ensuring you never miss a beat.
-
Underline or Box Your Tasks: Use the fine tip of a Mildliner to underline or box important tasks. This draws a clear line of focus to what you need to accomplish. By using different colors for different levels of priority, you can easily see which tasks are urgent and which can wait. For example, use red for urgent tasks and blue for those that are less pressing.
-
Use Symbols for Clarity: Another creative way to highlight tasks is by using symbols. Draw stars, arrows, or exclamation marks next to important tasks with the fine tip. This not only makes the task pop but also adds a bit of personality to your planner. Consider using a consistent symbol for urgent tasks across your pages, so you can spot them at a glance.
-
Color-Coded Highlighting: With Mildliners, you can assign a specific color to different types of tasks. For instance, you might use yellow for work-related tasks, pink for personal goals, and green for health and wellness activities. This system makes it easy to visually separate your tasks and helps you quickly identify what needs your attention in different areas of your life.
By incorporating these techniques, you’ll find that highlighting important tasks with Mildliners not only enhances organization but also adds a splash of color to your planner. Remember, the key is to experiment with different methods to see what works best for you. Have you tried using different colors to organize your tasks? Happy planning!
Creative Ways to Use Mildliners for Color Coding
Color coding is a fantastic way to keep your planner organized and easy to navigate. With a rainbow of Mildliner colors at your fingertips, you can create a system that makes finding information a breeze. Let’s explore some creative ways to use Mildliners for color coding in your planner.
-
Assign Colors to Categories: A simple yet effective technique is to assign different colors to various categories in your life. For example, you could use green for work tasks, pink for personal activities, and blue for hobbies. This system helps you see at a glance what your day or week looks like, and it ensures you don’t overlook important areas of your life.
-
Create a Key for Consistency: To keep your color-coding system consistent, consider creating a key in the front or back of your planner. This key will remind you which color corresponds to each category. It’s especially helpful if you’re trying to share your planner with others or if you need a quick reminder of your system. Plus, it adds a neat reference point to your planner.
-
Mix and Match for Depth: Don’t be afraid to mix and match colors to add depth to your coding system. For instance, you can layer two colors to create a new shade or use one color to underline and another to highlight. This method can help differentiate sub-tasks or specific details within a larger category, adding another layer of organization to your planner.
By using these creative ways to use Mildliners for color coding, you’ll enhance not only the organization of your planner but also its visual appeal. Remember, there’s no one-size-fits-all solution, so feel free to experiment until you find the system that works best for you. Get ready to transform your planner into a colorful and efficient tool that brightens your day!
Organizing Planner Layouts Using Mildliner Colors
Creating an organized planner layout can make a big difference in how you manage your time. By using Mildliner colors, you can turn any planner into a functional and beautiful tool. Let’s explore how organizing planner layouts using Mildliner colors can help you stay on top of your schedule.
-
Divide and Conquer: One effective way to organize your planner is by using colors to divide sections. For example, use different Mildliner shades to create borders around weekly or daily sections. This helps you quickly distinguish between different time frames and keeps your planner neat. You can also use colors to divide tasks within a single day, making it easier to see what needs to be done.
-
Highlight Headers: Use Mildliners to highlight headers or titles in your planner. Choose a color that stands out to mark the beginning of each section. This makes it easy to spot important areas, like “To-Do List” or “Appointments,” at a glance. By consistently using the same color for similar headers, you create a sense of order that’s visually pleasing.
-
Use Colors for Functional Decor: While aesthetics are important, functionality is key when organizing your planner. Use Mildliner colors to add simple decorative elements that also serve a purpose. For example, you can draw small icons or symbols in the margins to indicate different types of tasks, like meetings or deadlines. These small touches not only make your planner look nice but also add a layer of organization.
By organizing planner layouts using Mildliner colors, you’ll find that managing your planner becomes a more enjoyable and productive experience. Remember, the key is to find a system that works for you and makes your planning process smoother. With a bit of creativity and some colorful Mildliners, your planner can become a powerful tool for keeping your life organized and stress-free.
Enhancing Planner Aesthetics with Mildliner Designs
Your planner isn’t just a tool for staying organized—it’s also a canvas for creativity. With Mildliner designs, you can enhance your planner’s look while maintaining its functionality. Let’s dive into some exciting ideas for enhancing planner aesthetics with Mildliner designs.
-
Add Doodles and Patterns: Mildliners are perfect for adding small doodles and patterns that bring your planner pages to life. Use the fine tip to draw stars, hearts, or geometric shapes in the margins or around important notes. You can also create simple borders or frames that add a pop of color to your entries. These little touches make your planner unique and enjoyable to look at.
-
Theme Your Weeks: Another fun way to use Mildliner designs is by theming your weeks or months. Choose a color palette or theme, like “beach” or “forest,” and use related colors and imagery throughout your planner pages. This could include drawing small waves or trees, or using colors like blues and greens. Theming can make each week feel special and motivate you to stick to your planning routine.
-
Balance Function and Beauty: While it’s great to make your planner look beautiful, remember to keep it functional. Use Mildliner designs to highlight important sections, like deadlines or goals, without overcrowding your pages. Try using colors that complement each other and don’t overwhelm your writing. The key is to strike a balance so your planner remains a helpful tool while looking great.
Experimenting with Mildliner designs can transform your planner into a creative expression of your personality. Whether you’re adding doodles, theming your weeks, or blending colors, the possibilities are endless. By focusing on both aesthetics and functionality, you’ll create a planner that not only helps you stay organized but also inspires you every time you open it. Embrace your creativity and let your planner shine!
Conclusion
With these tips for using Mildliners in planners, you’re ready to make your planner both a tool and a work of art. Start experimenting today, and don’t forget to share your colorful creations with fellow planner enthusiasts! Consider visiting community subreddits like “BasicBulletJournals” or “planners” for inspiration and to connect with other creative individuals. Let’s make planning a colorful and joyful experience!